Join in an Online Messier Marathon

Online Messier Marathon with the Virtual Telescope Project.

Have you ever done a Messier Marathon? Want to try it online from the comfort of your own home? Astrophysicist Gianluca Masi will host a webcast today (April 9, 2013) at 18:00 UTC (2 pm EDT) (update: this webcast has been postponed due to clouds. We’ll post the new date and time when it becomes available). You can join in at this link, and explore the many treasures of the famous Messier Catalog. Masi said they will try to see as many of 110 objects in the Messier Catalog as possible in a single viewing session. This is what is called a Messier Marathon!

This is the fifth time the Virutal Telescope Project has attempted this, and they’ve had great success previously. Masi is doing the Marathon their robotic telescopes, and will provide real time images and live comments, along with answering your questions and “sharing your passion and excitement with friends from all around the world.”

For more information on how to join in see the Virtual Telescope Project’s website. For more info on a Messier Marathon and how to do one, see our excellent recent post by David Dickinson.

Here’s some examples of what you will be seeing today during the webcast:

A Detailed Look at the Coma of Comet PANSTARRS

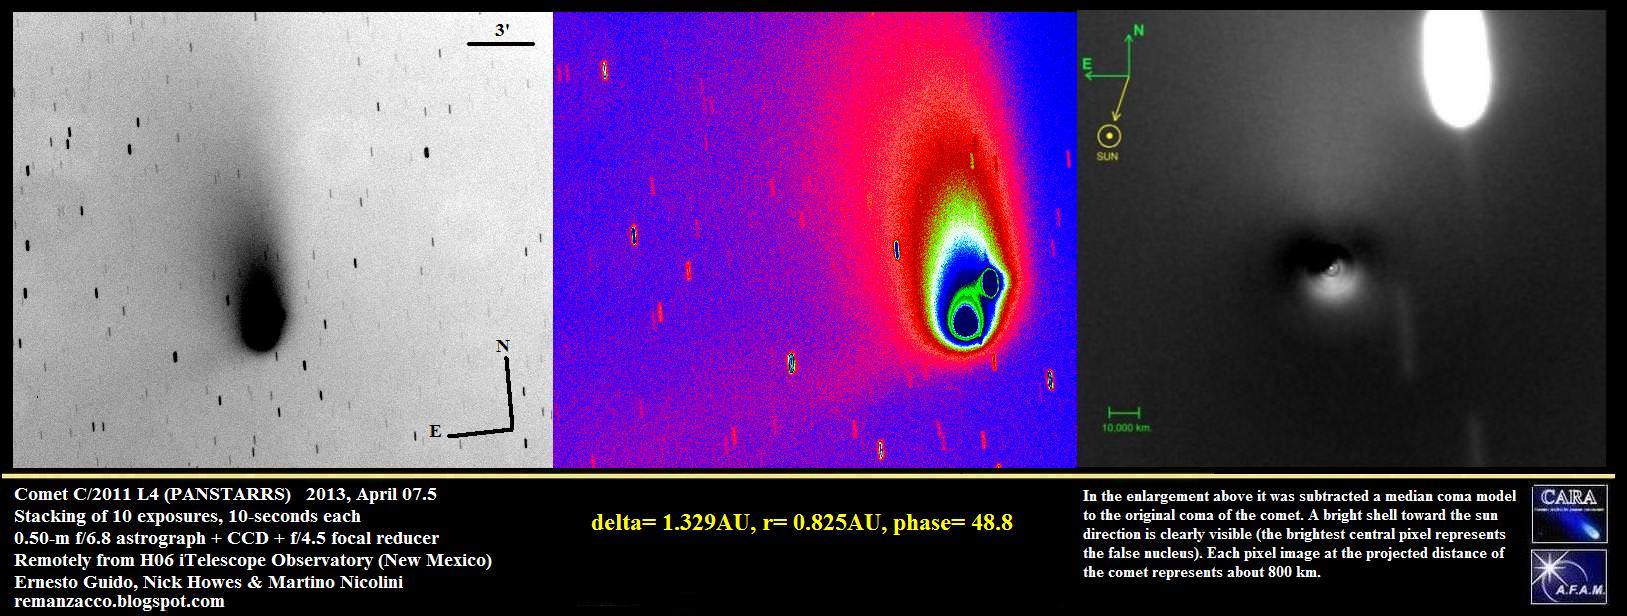
Image and variations of Comet C/2011 L4 (PANSTARRS) taken on 2013, April 7, 2013 remotely from New Mexico. Credit: Ernesto Guido, Nick Howes, and Martino Nicolini.

Comet PANSTARRS has peaked, but astronomers are still keeping an eye on this comet to try and determine what its future might hold. The team from the Remanzacco Observatory has just produced some really interesting views of Comet PANSTARRS, with a little help from Martino Nicolini and his Astroart software.

Team member Nick Howes called this software “one of the best astronomical image processing and acquisition tools around,” and explained how these views can tell astronomers more about what is happening with the comet.

“The isophotes image (color coded) is a good way to see the morphology/structure of the coma,” he told Universe Today, adding that comparing the images here is “a very good way to determine any major events like a fragmentation. We’re hopeful that once PANSTARRS gets a bit higher, we’ll be able to look at it in even more detail with the 2 meter Faulkes scopes.

And with the image processing in the image on the far right, it’s possible to see a bright shell in the coma of comet C/2011 L4 (PANSTARRS).

“The last elaboration in that image has been obtained using the M.C.M. (Median Coma Model), a filter that has the purpose of creating — from an image of a comet — a synthetic model of the ‘regular’ coma,” said Ernesto Guido, from the Remanzacco team. “That is obtained by mapping all the pixels that compose the image and averaging them together. In doing so we delete all the morphological “non-uniformity” contained in the coma itself. This regular coma will then be subtracted from the original image highlighting all the details that are normally immersed in the uniform brightness of the coma.”

Check out the Remanzacco website for more information and their continued updates.

Join International Dark Sky Week (April 5-11, 2013)

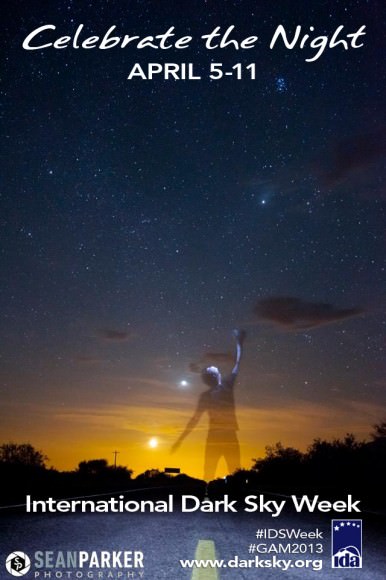
International Dark Sky Week banner, courtesy Sean Parker Photography.

Take the next few nights to celebrate the stars! The International Dark Sky Week is a worldwide event, and part of Global Astronomy Month – going on now! The goals of IDSW are to appreciate the beauty of the night sky and to raise awareness of how poor-quality lighting creates light pollution.

The International Dark-Sky Association says that light pollution is a growing problem: “Not only does it have detrimental effects on our views of the night sky, but it also disrupts the natural environment, wastes energy, and has the potential to cause health problems.”

Here are some ways that the IDA suggests how you can spread the word about IDSW during April 5-11 — as well and all year long:

Join IDA online! Post about dark skies awareness on the social media sites, and you can follow the IDA on Facebook, Twitter, G+ and any other social media you like. And if you would like to become a partner email [email protected] to learn more. See a list of existing partners here.

Check around your home. Make sure your outdoor-lighting fixtures are well shielded — or at least angled down — to minimize “light trespass” beyond your property. Do you have security lights that stay on all night? Consider adding a motion-detector, which can pay for itself in energy savings in just a few months. You’ll find lots of great suggestions in “Good Neighbor Outdoor Lighting” and you can perform your own outdoor lighting audit.

Talk to your neighbors. Explain that bright, glaring lights are actually counterproductive to good nighttime vision. Glare diminishes your ability to see well at night, because the pupils of your eyes constrict in response to the glare — even though everything else around you is dark. Show them this handout.

International Dark Sky Week poster. Image courtesy Sean Parker Photography.

Ask your local library if you can put up an IDA poster showing good and bad lights. Include a photo of the Earth at night, and take some pictures around town that show examples of good and bad lighting.

Become a Citizen Scientist with GLOBE at Night and similar programs, observe light pollution wherever you are and contribute to reports coming in from across the globe about light pollution. Or join GLOBE at Night’s Adopt-A-Street program and ‘map’ light pollution in your community.

Become a Dark Sky Ranger. Teachers and families can do these activities that include an outdoor lighting audit, a game, and hands-on crafts to help visualize the night sky better. In English. In Portuguese.

Attend or throw a star party! International Dark Sky Week is a great opportunity to dust off the old telescope in your attic and use it share in the wonder of the universe with your family, friends, and neighbors. Visit the Night Sky Network to find a calendar of star parties or to find an astronomy club in your area. Click here to find out what’s up in the sky. This activity book is full of great activities for budding stargazers of all ages!

Photograph the sky and enter it in the 2013 International Earth and Sky Photo Contest, run by The World at Night, or photograph some constellations and submit the pictures to the Dark Skies Photo Project to measure light pollution.

Here’s a great video: “Losing the Dark,” IDA’s public service announcement:

A Guide to Help You See Comet PANSTARRS at its Brightest

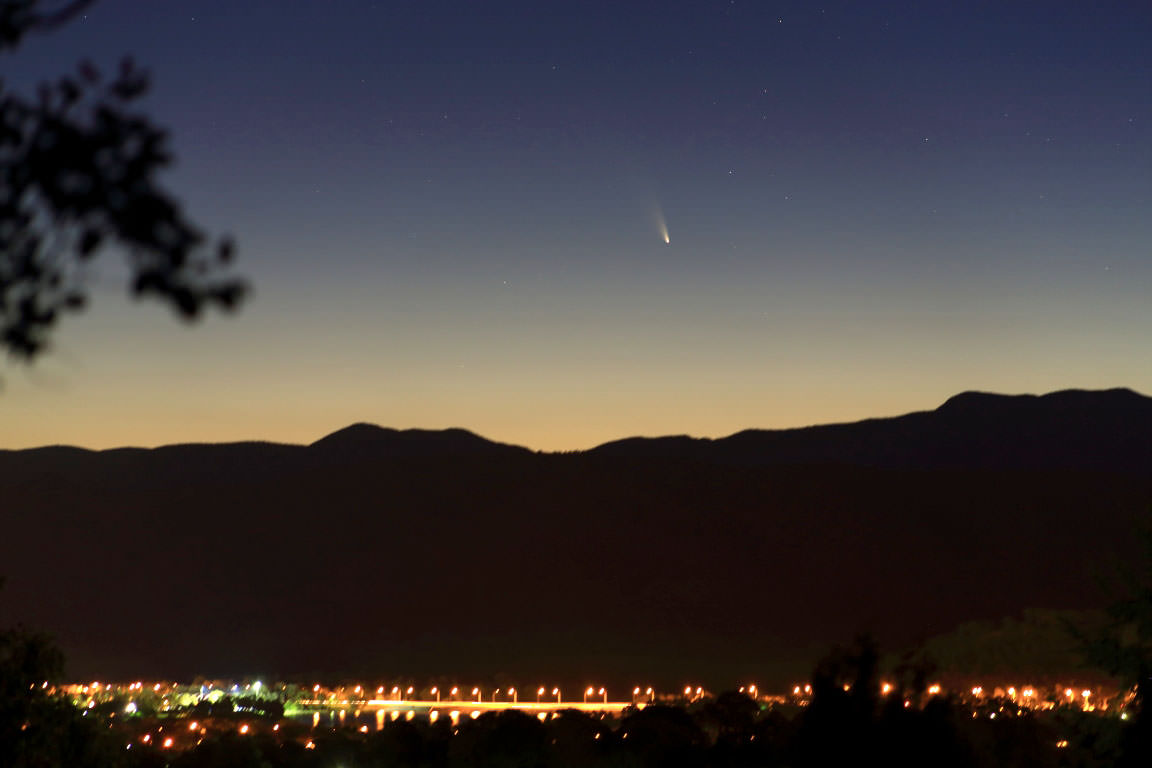
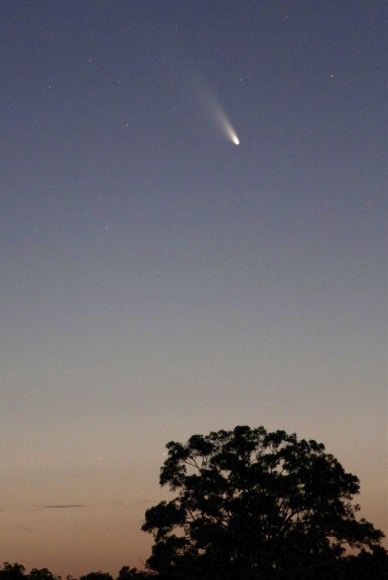
Comet L4 PANSTARRS setting over Brindabella Ranges to the west of Canberra, Australia on March 5, 2013. The photo gives a good idea of the naked eye of the comet. Credit: Vello Tabur

This is the big week so many of us in the northern hemisphere have been waiting for. Comet C/2011 L4 PANSTARRS, which has put on a splendid show in the southern hemisphere, now finally comes to a sky near us northerners!

Sky watchers in Australia and southern South America report it looks like a fuzzy star a little brighter than those in the Big Dipper with a short stub of a tail  visible to the naked eye. The comet should brighten further as it wings its way sunward. Closest approach to the sun happens on March 10 at a distance of 28 million miles. That’s about 8 million miles closer than the orbit of Mercury.

Though very low in the western sky after sundown, the comet should be visible across much of the U.S., southern Canada and Europe beginning tonight March 8.

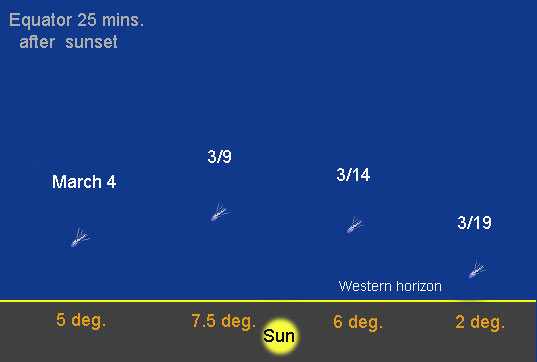
Comet PANSTARRS will be visible tonight through about March 19 for sky watchers living near the equator. Map is drawn for Singapore. All maps created with Chris Marriott's SkyMap software
Comet PANSTARRS will be visible through about March 19 for sky watchers living near the equator. Map is drawn for Singapore. All maps created with Chris Marriott’s SkyMap software

PANSTARRS’ low altitude presents a few challenges. Approaching clouds, general haziness and the extra thickness of the atmosphere near the horizon absorbs the comet’s light, causing it to appear fainter than you’d expect. A casual sky watcher may not even notice its presence. That’s why I recommend bringing along a pair of binoculars and using the map that best fits your latitude. Find a place with a wide open view to the west, focus your binoculars on the most distant object you can find (clouds are ideal) and then slowly sweep back and forth across the sky low above the western horizon

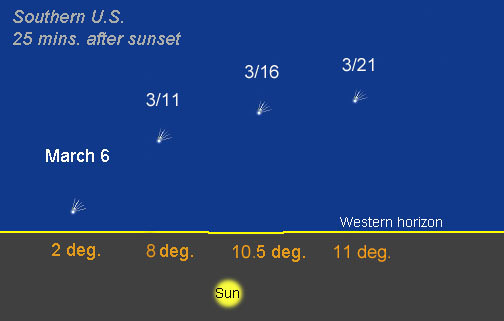
Comet PANSTARRS map for the southern U.S. March 6-21. Time shown is about 25 minutes after sunset facing west. Map is drawn for Phoenix, Ariz.

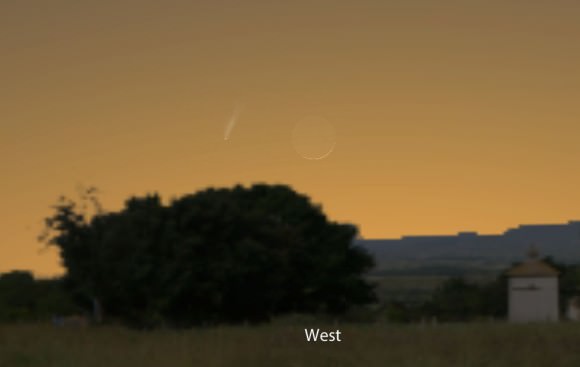
As the nights pass, PANSTARRS rises higher in the sky and becomes easier to spot for northern hemisphere observers while disappearing from view in the south. On the 12th, a thin lunar crescent will shine just to the right of the comet. Not only will it make finding this fuzzy visitor easy-peasy, but you’ll have the opportunity to make a beautiful photograph.

Comet PANSTARRS and thin crescent moon should be a striking site about a half hour to 45 minutes after sunset on March 12. Stellarium
Comet PANSTARRS and the thin crescent Moon should make a striking sight together about a half hour to 45 minutes after sunset on March 12. Stellarium

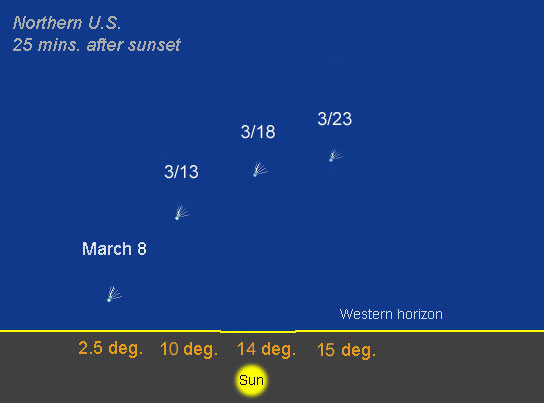
The maps shows the arc of the comet across the western sky in the coming two weeks for three different latitudes. Along the bottom of each map is the comet’s altitude in degrees for the four labeled dates. The sun, which is below the horizon, but whose bright glow you’ll see above its setting point, will help you determine exactly in what direction to look.

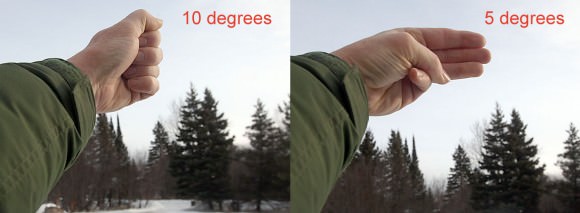
One of your best observing tools and the one closest at hand (pun intended) is your hand. Photo: Bob King

A word about altitude. Astronomers measure it in degrees. One degree is the width of your little finger held at arm’s length against the sky. Believe it or not, this covers two full moon’s worth of sky. Three fingers at arm’s length equals 5 degrees or the separation between the two stars at the end of the bowl of the Big Dipper. A fist is 10 degrees. This weekend PANSTARRS will be 2-3 “fingers” high around 25 minutes after sunset when the sky is dark enough to go for it.

The northern U.S. is favored for this leg of the comet's journey. Notice how the comet arcs up higher in the sky compared to the southern U.S. and especially the equator. Map drawn for Duluth, Minn. The comet will remain visible for many weeks. Earth is closest to PANSTARRS on March 5 at 102 million miles.
The northern U.S. is favored for this leg of the comet’s journey. Notice how the comet arcs up higher in the sky compared to the southern U.S. and especially the equator. Map drawn for Duluth, Minn. The comet will remain visible for many weeks. Earth is closest to PANSTARRS on March 5 at 102 million miles.

To find PANSTARRS, locate it on the map for a particular date, note its approximate altitude and relation to where the sun set and look in that direction. Assuming your sky to the west is wide open and clear, you should see a comet staring back. If you don’t find it one night, don’t give up. Go out the next clear night and try again. While Comet PANSTARRS will fade over the next few weeks, it will also rise higher into a darker sky and become – for a time – easier to see. I also encourage you to take out your telescope for a look. You’ll see more color in the comet’s head, details in its tail and an intensely bright nucleus (center of the comet), a sign of how fiercely sunlight and solar heating are beating up on this tender object.

Sound good? Great – now have at it!

Comet PANSTARRS Crosses Paths With Zodiacal Light

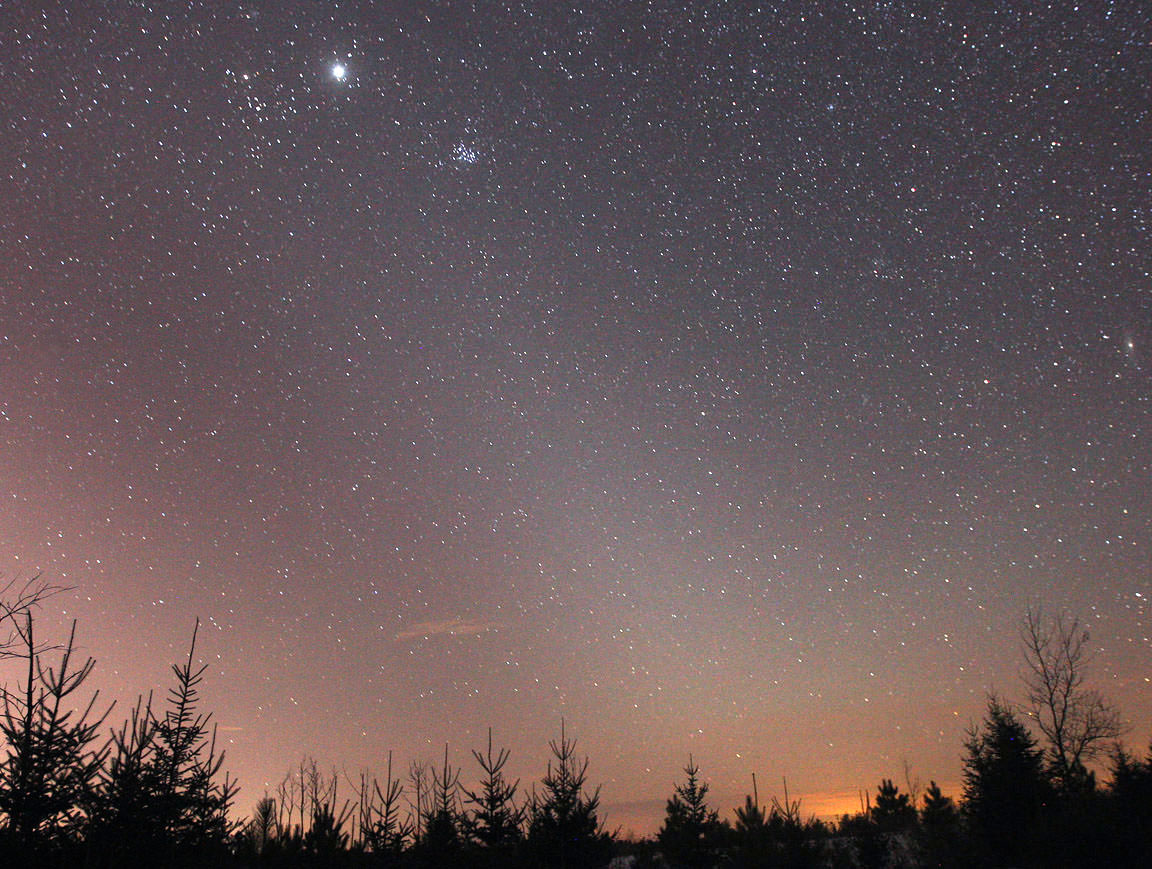
The tapering wedge of the zodiacal light reaches from the western horizon on March 3, 2013 toward the bright Planet Jupiter at top. Credit: Bob King

With the much-anticipated PANSTARRS comet emerging into the evening sky this week, we might keep our eyes open to another sight happening at nearly the same time. If you live where the sky to the west is very dark, look for the zodiacal light, a tapering cone of softly-luminous light slanting up from the western horizon toward the bright planet Jupiter near twilight’s end.

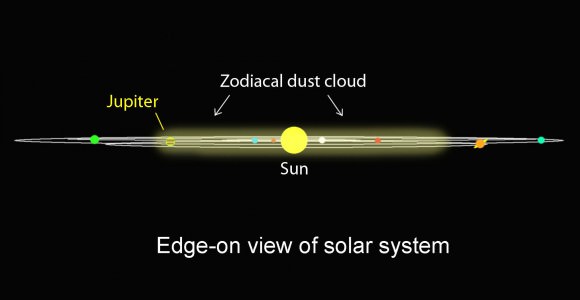
It makes its first appearance about 75 minutes after sunset and lingers for an hour and a half. Sunlight reflected from countless dust particles shed by comets and to a lesser degree by colliding asteroids is responsible for this little-noticed phenomenon. Comets orbiting approximately in the plane of the solar system between Jupiter and the sun are its key contributors. Jupiter’s gravity stirs the works into a pancake-like cloud that permeates the inner solar system.

The zodiacal is formed of dust left behind by comets orbiting between Jupiter and the sun and forms a pancake-like structure in the plane of the planets. Illustration: Bob King

More of us would be more aware of the zodiacal light if we knew better when and where to look. While a dark sky is essential, you don’t have to move to the Atacama Desert. I live 9 miles from a moderate-sized, light-polluted city; the western sky is terrible but the east is plenty dark and ideal for watching the morning zodiacal light in the fall months.

Near its base, the cone easily matches the summer Milky Way in brightness and spans about two fists held horizontally at arm’s length. At first glance you’d be tempted to think it was the lingering glow of twilight until you realize it’s nearly two hours after sunset. The farther you follow up the cone, the fainter and narrower it becomes. From top to bottom the light pyramid measures nearly five fists long. In other words, it’s HUGE.

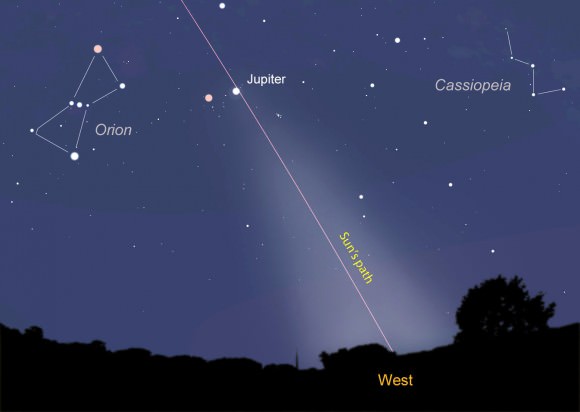
The pyramid-shaped zodiacal light cone is centered on the same path the sun and planets take across the sky called the ecliptic. This map shows the sky 90 minutes after sunset in early March facing west. Created with Stellarium
The pyramid-shaped zodiacal light cone is centered on the same path the sun and planets take across the sky called the ecliptic. This map shows the sky facing west 90 minutes after sunset in early March. Created with Stellarium

The zodiacal light is centered on the same path the sun and planets take through the sky called the ecliptic, an imaginary circle that runs through the familiar 12 constellations of the zodiac. Every spring, that path intersects the western horizon at dusk at a steep angle, tilting the light cone up into clear view. A similar situation happens in the eastern sky before dawn in October. Of course the light’s there all year long, but we don’t notice it because it’s slanted at a lower angle and blends into the hazy air near the horizon.

The zodiacal light we see at dusk is a portion of the larger zodiacal dust cloud that extends at least to Jupiter’s distance (~500 million miles) on either side of the Sun, making it the single biggest thing in the Solar System visible with the naked eye. Under exceptional skies, like those found on distant mountaintops or far from city lights, the cone tapers into the zodiacal band that completely encircles the sky.

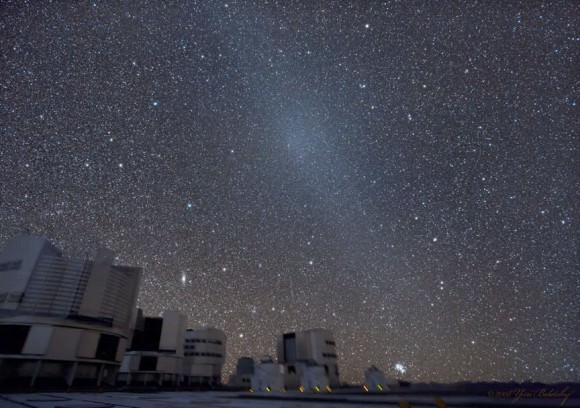
The gegenschein is the small, oval glow within the zodiacal band seen in this photo taken at the European Southern Observatory in Chile. Credit: ESO / Yuri Beletsky

Exactly opposite the sun around local midnight, you might see an enhancement in the band called the gegenschein (GAY-gen-shine). This eerie oval glow is caused by sunlight shining directly on interplanetary dust grains and then back to your eye. A similar boost happens for the same reason at the time of full moon.

Deep connections abound throughout the universe. Over time, much of the comet dust in the zodiacal cloud either spirals inward toward the sun or gets pushed outward by solar radiation. The fact that we can still see it today means it’s continually being replenished by the silent comings and goings of comets.

Comet C/2011 L4 PANSTARRS photographed with a 200mm telephoto lens over Bridgetown, Western Australia on March 3. Credit: Jim Gifford
Comet C/2011 L4 PANSTARRS photographed with a 200mm telephoto lens over Bridgetown, Western Australia on March 3.
Credit: Jim Gifford

Consider Comet L4 PANSTARRS. Dribs and drabs of dust sputtered from this comet during its current trip to the inner solar system may find their way into the zodiacal cloud to secure its presence for future sky watchers. How wonderful then the comet and the ghostly light should happen to be at their best the very same time of year.

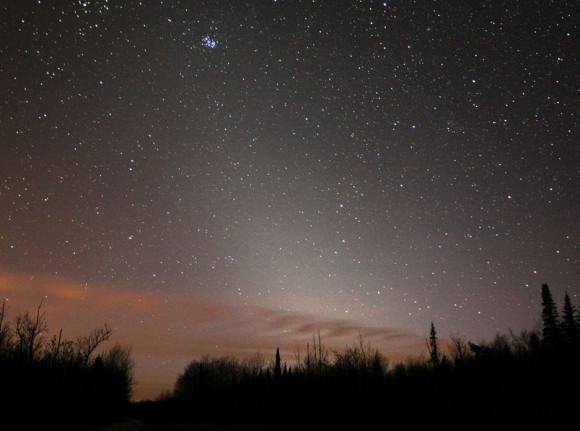
Zodical light touching the Seven Sisters star cluster also known as the Pleiades March 19, 2012. Credit: Bob King

Now through March 13 is the ideal time for zodiacal light viewing. If you begin your evening with Comet PANSTARRS, stick around until nightfall to spot the light. Face west and cast a wide view across the sky, sweeping your gaze from left to right and back again. Look for a big, hazy glow reaching from the horizon toward the Planet Jupiter. After the 13th, the waxing moon will wash out the subtle light cone for a time. Another “zodiacal window” opens up in late March through mid-April when the moon comes up too late to spoil the view.

As you take in the sight, consider how something as small as a dust mote, when teamed with its mates, can create a jaw-dropping comet’s tail, meet its end in the fiery finale of a meteor shower or span a billion miles of space.

Losing the Night: New Video Highlights Problems of Light Pollution

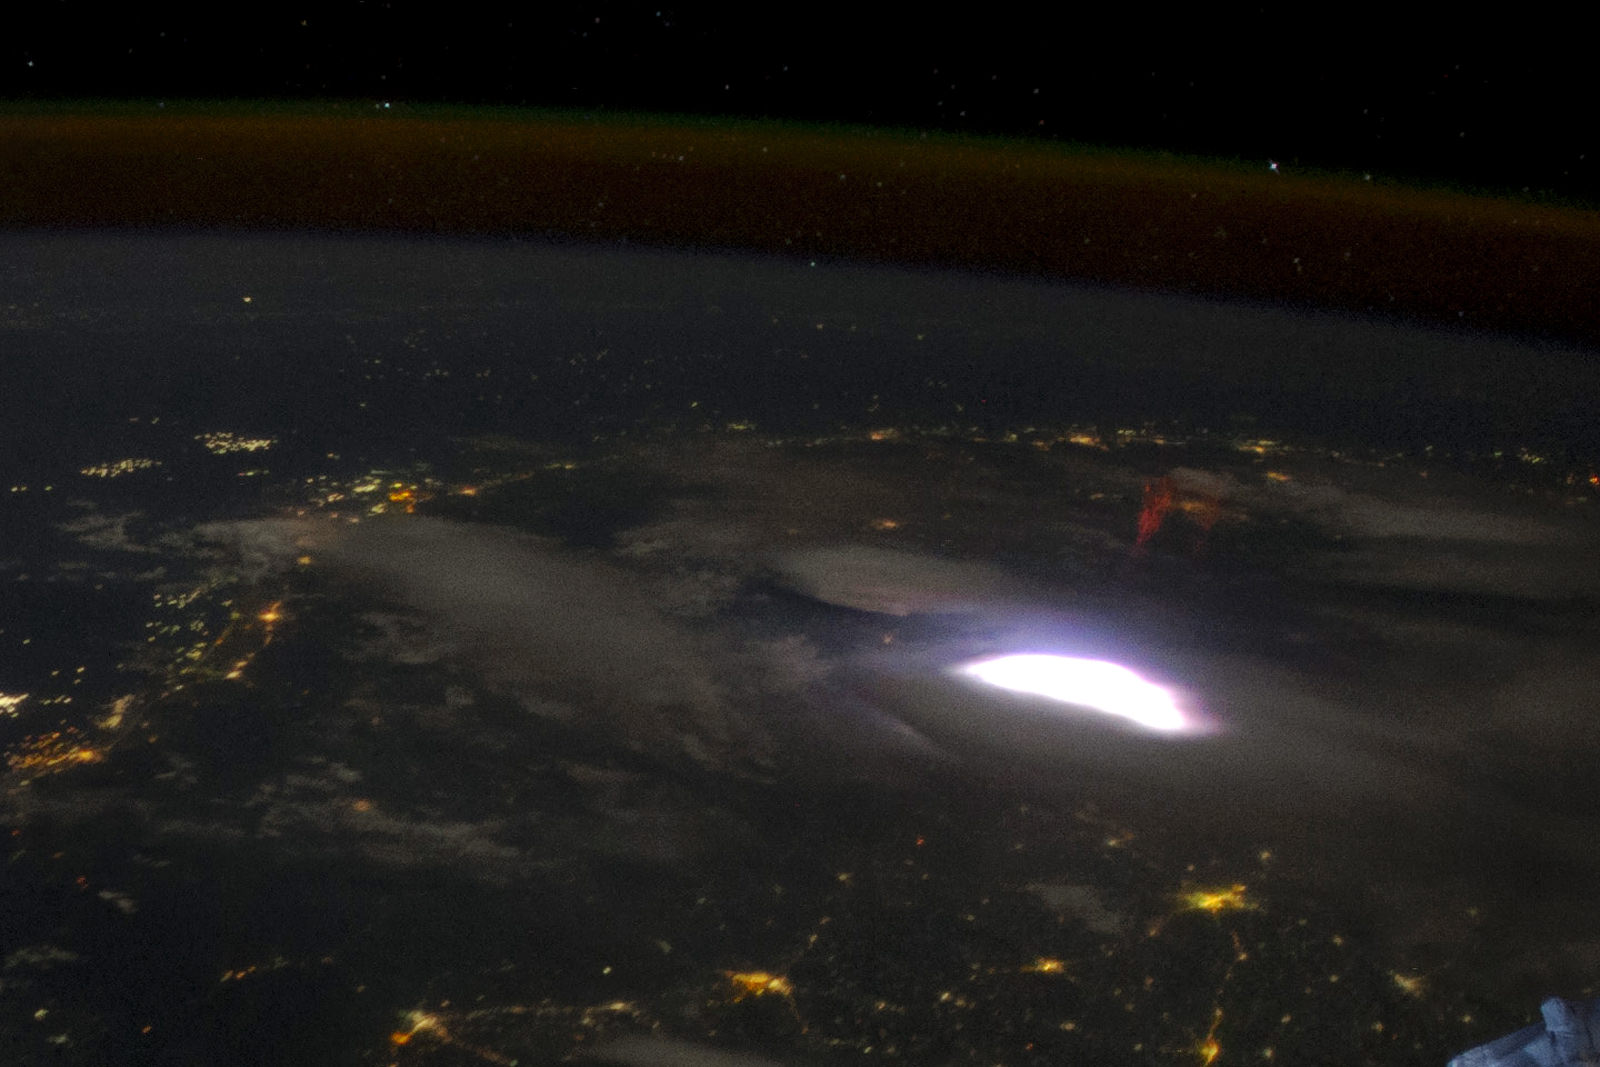
Air glow (along with a lightning sprite) is visible in this image from the International Space Station. Credit: NASA

Light pollution is a two-way murky street. Not only have millions of people never seen the glow of our Milky Way in the night sky because of light pollution, but also when astronauts in the International Space Station look down at Earth, they see lights almost everywhere and a faint green or yellow air-glow — caused mostly by light pollution — hovers over the planet in a majority of the images they send back from space.

“Light pollution threatens the health of every living thing on Earth,” says a new planetarium-like video from the International Dark-Sky Association in collaboration with Loch Ness Productions, a U.S.-based full-dome planetarium show production company.

“Losing the Dark” illustrates problems caused by light pollution, with particular emphasis on how it affects night-sky visibility. But the video also offers simple solutions for mitigating light pollution, and reminds everyone it is not too late to save the starry sky.

Bob Parks, IDA Executive Director said, “Everyone who views ‘Losing the Dark’ can see how easy it is to make wise choices about outdoor lighting, and that together we can work to restore the night sky to its former glory.”

The video is narrated by astronomer Carolyn Collins Petersen, (whose voice you may recognize from past 365 Days of Astronomy podcasts), and the show is also available in full-dome versions for planetariums and science centers as a public service announcement.

“Planetariums champion the night sky already,” Collins Petersen said. “They tap into public awareness, so their audiences are a prime demographic for this message. The show gives planetarium professionals another tool to help educate the public about this critical issue. The HD version extends the message to more people through presentations by educators and dark-sky advocates.”

For more information about the video, see the International Dark Skies Association website.

What’s Up in the Night Skies for January 2013?

Jane Houston Jones from JPL provides a video preview of the night skies in the first month of the new year. There will be plenty of planetary conjunctions with the Moon: Saturn, Venus, Mars and Jupiter will all be snuggling up with the Moon throughout the month. Jane also suggests using NASA’s Eyes on the Solar System to keep track of where all the different missions are throughout the solar system. If you haven’t yet checked out this amazing site, it is an interactive 3-D “universe” where you can explore the cosmos from your computer. You can fly along with almost any NASA mission, hop on an asteroid, see the entire Solar System moving in real time, or re-live the Mars Curiosity landing. But you have the option of controlling when and where you are. It’s fully addictive!

Timelapse From Inside a Telescope

This timelapse is different than most because it allows you to see the actions of the South African Large Telescope (SALT) from a unique point of view: the camera is mounted on the mirror structure, but also visible is the awesome field of view. Dr. Bruno Letarte compiled this video from 3 consecutive nights observing in July 2012 showing SALT in action. He also provides a tour of the inside of the telescope as well.

Additionally, Letarte provides detailed info of what is being observed, what scientist or team is doing the observing, and additional details of what is actually happening. If you want a more traditional timelapse of the night sky, see below for Letarte’s Volume I of this pair of videos. It shows a stunningly beautiful look at the southern sky, and points out several of the constellations and other objects that are visible.
Continue reading “Timelapse From Inside a Telescope”

Notes from an Amateur Telescope Maker’s Journal, Part 2

First of all, I’d like to say thank you for all the feedback on the first entry from the Amateur Telescope Maker’s Journal and say “Hello! Kia ora! Namaste! Greetings and Salutations!” to all the amateur, professional and armchair astronomers who wrote from the USA, Guatemala, New Zealand, Finland, India and elsewhere. What a kick it’s been to hear from everyone, and I like to think that astronomy and watching the stars is a shared language between people from around the world.

If I have succeeded in whetting your appetite for such things and you are still interested in, or even thinking about trying to build your own telescope, you might want to read on.

Two tips to remember: “Any job worth doing is worth doing right!” No excuses! and “The longest journey begins with the first step!” Here we go!

My first step was collecting as many fasteners as I could gather. I like to repair and build things and have found that fasteners always come in handy for this or that project. Eventually the fasteners I collected became crucial in the building of my telescope! If you do decide to, or are thinking about building your own telescope, you might do some serious fastener scavenging first, or if you can afford it, go out and buy a complete set of precision stainless steel nuts and bolts. I can’t over emphasize how important this step is. Believe me, you will need them.

My favorite scavenger hunt was the result of looking in a trash bin (dumpster diving anyone?) next to a computer test equipment manufacturing company where I worked the 1980’s. During inventory the ‘powers that be’, found it actually cheaper to throw away – if you can believe it — the used and/or unsorted fasteners left over from one project or another. This was cheaper than re-sorting and re-stocking I was asked by one of the techs, if I’d be interested in collecting some of them. Of course I was! Some of those ‘slightly used’ fasteners still live in mayonnaise, peanut butter and pickle jars in my garage!

A word about scavenging, in fact, a caution: Remember to be extremely careful when handling old electronic components. For example: TV or stereo capacitors when not fully discharged present a serious shock hazard! Also, collecting components from any leaky or cracked open transformers or other components should be suspect and left alone. Got contamination? Burnt components or signs of burning are also a not good prospect. Leave it alone! Old machinery and tools found at swap meets, garage sales and recycle centers are the best resource.

Many of us amateur astronomers are on a very limited budget. We have to do the best we can to find, adapt or modify that which allows us to follow our astronomy bliss. I am not above scavenging and getting my hands dirty to do the deed!

The main mirror in a Newtonian telescope is obviously the most important single component? That is to say, aside from the eyepieces, the secondary and main mirror mount! I’ve always wanted a larger scope and was hugely excited when I heard about a 12 ½-inch mirror for sale through a friend. Buying that mirror made the rest of my project possible and the other pieces fall into place. Here, I’d like to applaud the synchronicity and blind luck!

Originally I opted to build the easiest and quickest to build mount for this telescope. That would be a ‘Dobson’ style or alt-azimuth style turntable mount. A 14 inch diameter ‘sono’ tube (a concrete pier mold) came with the mirror I bought. I experimented with this tube for a while as part of the OTA (Optical Train Assembly) but found it too heavy and clumsy to handle easily. So instead, I decided to build some sort of N/S E/W polar aligned mount. A yoke mount? A German Equatorial? or a fork mount? I had to think on that for awhile.

After buying the mirror, I found myself at a ‘point of no return’. Now was the time to consider the final design and move forward! At first, I was tempted to build a simple Dobson style mount. (John Dobson is a hero of mine!) The heavy duty ‘sono tube’ concrete pier form was originally intended as the main body of the scope. Man-O-Man, was that thing ever heavy! And kind of ugly too. The more I thought about it the more I realized it would be too heavy and probably too hard to transport. That’s when I decided to try something a little bit lighter… and maybe a little different.

I received several requests for more construction details which follow, after this progress report…

I painted the counter balance arm and counter weights with acrylic paint(s). For transporting the telescope the OTA is removed and the lead weights and steel counter balance bar removed. Handling uncoated lead or galvanized steel pipe regularly is known to be a source of heavy metal contamination. Use precautionary measures including gloves and or masks when handling or working these materials!

The most recent addition to my home-built telescope is the bright orange tennis ball at the end of the counter balance bar. I traced the end of the pipe onto the tennis ball with a pencil, then cut out the circle with an exacto knife. (CAREFULLY!) After trimming, it fit snugly in place. Next up: I will find a small battery powered red LED and mount it on the end of the tennis ball. The batteries will ‘live’ inside the removable ball. I made the plywood box to hold counter balance weights, tools, supplies and battery(s). It is also a handy ‘step up’ to the eyepiece, for shorter viewers. The top of the box I covered with a new car floor mat I found lying on the side of the road… Is that road kill?

Now, how about some more construction details:

The plant saucer I used to cover the main mirror housing has a dual function.
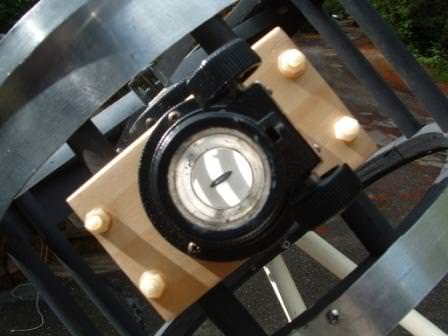
The circularly embossed rings in the top help align the focuser and secondary!
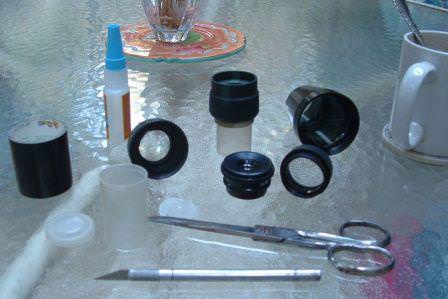
Now, let’s talk about some inexpensive eyepieces. Have you ever made your own? Why not?

I collected optical components from old cameras, dark room projectors, binoculars and video cameras I found along the way. Some of the optics had quite reasonable focal lengths and diameters, which made them easier to modify and turn into useful eyepieces! Inexpensive and readily available materials can be used with quite satisfactory results… that is if you aren’t a perfectionist.

Above, I show how I used old 35 mm film canisters to make eyepieces. Use an Exacto knife to cut out the bottom of plastic film containers. These containers come in several colors. I prefer the black one’s but transparent work well too! The canisters have a 1 1/4 inch outside diameter and will fit into the 1 1/4 inch eyepiece holder later.
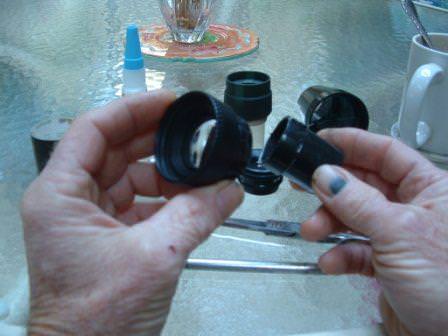
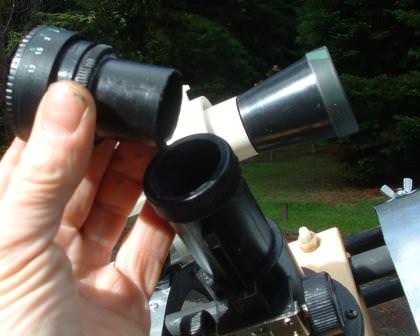
In these views I am shown attaching a modified film canister to a ‘recycled’ 24mm video camera lens.

I wrapped the end of the film canister with black tape to make up for the difference in diameters. The modified canister then fit snugly into the end of the lens body. This handmade eyepiece has a VERY wide field yet performs fairly well! There is no color shift in the crisp, wide angle view… Yes! I like!
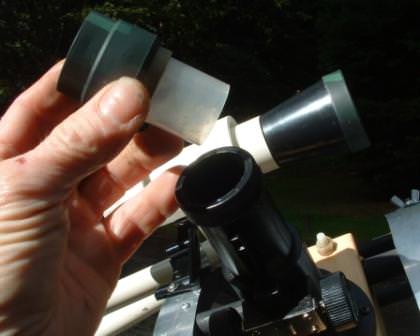
I did the same thing with one of the eyepieces from the Chinese binoculars I had. The 20 mm eyepiece has great eye relief! In this case, the modified film canister is super glued into place. Note: BE VERY CAREFUL when applying super glue near any optical surface! The fumes released during curing can severely damage any lens! Not that this has ever happened to me…. no……

Construction details: Continued

The leveling screws use drilled out faucet handles. I found that needed to rub some graphite onto the threads to stop them from squeaking loudly. The lag bolts pass thru clear holes in the 2 X 4’s. There are threaded inserts installed on the bottoms of the four hole locations. The faucet handles are locked in place with cap screws and nuts. The wheel axle is a solid steel rod, 3/8 inches diameter and has holes drilled thru either end for cotter pins, washers and keepers. The gap between the wheel and the modified aluminum router table is maintained with a cut piece of clear, thick walled nylon tubing.
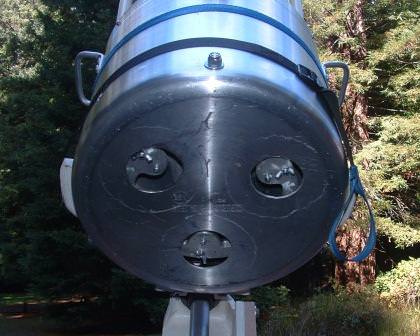
The main mirror adjustment or collimating screws are accessed through these holes in the base of the main mirror mount.

Eventually, I will mount a cooling fan here.

Here’s how I made the secondary spider legs…
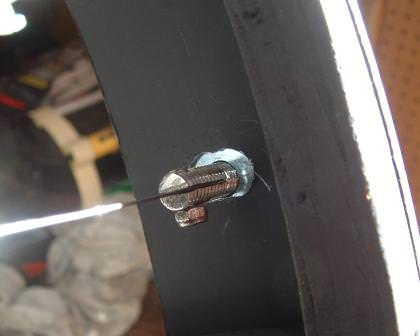

I used 2 inch long 1/4-20 bolts and cut off the heads. Then I cut a slot 1/2 way down the bolt shafts with a hand held hacksaw. I cut thin stainless steel packing straps to fit – rounded the ends – then drilled a thru hole for #00 lock nuts and screws to fasten the assembly. On the far side, there’s a SS washer and thumbscrew.
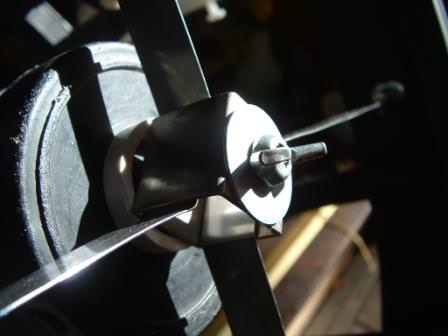
The secondary mirror housing mount was made from a 1 inch long section of 1 inch square stainless steel tubing. The stainless steel packing straps were then inserted and bent 45 degrees to fit.

How’s that for details? Of course, some ideas are not mine. I copied good ideas from elsewhere, created my own and am passing them forward to you. Does that work for you? I hope you’ve found some of this stuff useful or at least interesting? Please write and let me know? I’d appreciate it and promise to reply. I’m just a ‘lonely’ astronomer and would love to hear from you!

By the way… got any old telescope parts laying around? I’m always looking for more!